The information provided is a general guideline. The information does not guarantee success. Any information used will be done at the user’s risk. Fibreglass Warehouse can in no form be held responsible for outcome of using this information.
Plug preparation
To make a mould, a plug is needed. A plug is the exact shape and dimension that the final part will be. Many times, a replica is being made of an existing part, such as a bumper for a car or a canoe. Other times, modeling clay, wood, or sheet metal is formed into the final shape. If the plug is porous, such as wood, plaster, it will need to be sealed first with lacquer or resin.
The plug should be buffed and sealed with products such as TR-301 and TR-311.
A coat of mould release will need to be applied. Partall #2 is commonly used. Five coats is a good number to make sure it is well coated, each time buffing afterwards. For security, Partall #10, (Polyvinyl alcohol or PVA) is used. It is a plastic dissolved in alcohol. It is sprayed (recommended) or brushed on, allowing thirty minutes to dry. Three coats should be applied if you want the best possible release. Spraying with a fine paint sprayer works the best. The first coat should be a ‘mist’ coat and the following 2 coats a bit thicker.
Gelcoat
Tooling gelcoat is used to give the mould surface a strong, scratch resistant surface. Please see our Gelcoat Preparation and Application page for details on how to mix and apply gelcoat. Tooling gelcoat comes in black or orange to be able to tell the difference between the part and mould. ***Do not use Gelcoat with wax in it.*** Spray (recommended) a thick layer of gelcoat on the plug.
The layer should be between 15 and 20 mils. Let the layer cure. (If the layer is not mostly cured, the styrene in the following coat may cause it to wrinkle) Allow to cure for 2 to 4 hours, or until the gelcoat cannot be scratched with your fingernail, but still tacky.
Fibreglassing
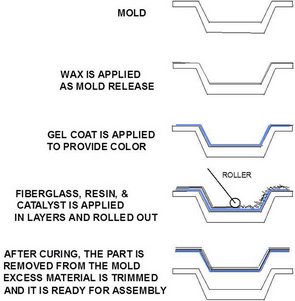
A layer of 1 oz Chopped Strand Mat should be laid down as the first layer. General Purpose Polyester resin or ISO Resin 75-200-319 is commonly used as the resin. The ISO resin is a tooling resin which shrinks less than the GP resin. This may not be a factor for most parts, but large moulds or final parts with critical dimensions should use the ISO resin. The resin should be mixed with 1% to 2% MEKP. Wet the mat out with a brush or spreader. Work the resin in with bristle roller.
Afterwards, use a aluminium roller to force out all the air. When you are done, there should be no white fibres or air pockets visible. Allow the resin to cure. When the resin is hard, but still tacky, it is time to put the next layer on. Never cure multiple layers at one time because this may cause warping, especially in large moulds.
Add additional layers of mat and/or cloth to give the mould strength. An additional 3 layers of 1.5 oz mat is usually sufficient, depending on the application. Be sure to allow adequate curing time between layers.
Removing the Plug
Allow 2 or 3 days for the mould to cure completely. Use a plastic wedge or sharpened paint stirrer (never use hard or metal tools) to slide between the mould and plug. (If there is excess resin or fibreglass hanging over the edge of the plug, the plug will not be able to slide out. The excess will need to be cut off.) Separate the entire edge of the mould from the plug. You should be able to remove the plug from the mould.
Mould Preparation
It is time now to prepare the mould for use. Most times, the mould will need to be sanded and polished. Sand the mould by using 220 grit going to 600 grit. Afterwards use the TR 301 and 311 (or equivalent, Meguiars #1 and #3 will work also) to polish and seal the mould. Wax and buff with Partall #2 and coat with Partall #10. For the first 5 parts off the mould, use Partall #2 and Partall #10 again. This should fully season the mould. Apply Partall #2 after each part going forth.
Call (02) 9820 1595
For Expert fibreglass advice
or send a message below

